
Setting up your Homemail Online account across different email clients doesn’t have to be a daunting task. Whether you prefer using desktop applications or web-based interfaces, this guide will walk you through the simple steps to configure your Homemail online email on various platforms. We’ll cover popular email clients including Mailbird, Gmail, Outlook, Thunderbird, and Windows Mail, ensuring you can access your Homemail online from your preferred application.
For those looking for the easiest and most streamlined experience, Mailbird offers an intelligent solution that can often automatically detect your Homemail online server settings. This can save you valuable time and effort, making the setup process a breeze. However, for users of other email clients or those who prefer manual configuration, we’ve provided detailed, step-by-step instructions with visual aids to guide you.
Let’s dive into setting up your Homemail online on each of these email clients.
Configuring Homemail Online on Mailbird
Mailbird is designed for ease of use, and setting up your Homemail online account is incredibly straightforward.
To begin, launch Mailbird on your desktop.
 Step 1: Initial setup screen on Mailbird Desktop Client prompting users to enter their name and email address for Homemail.com configuration.
Step 1: Enter your full name and your Homemail online email address in the provided fields. Click the “Continue” button to proceed.
Mailbird will then attempt to automatically detect your email server settings for Homemail online. This intelligent feature simplifies the process significantly.
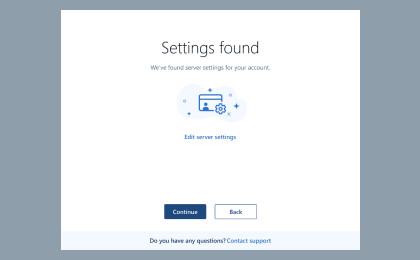 Step 2: Mailbird Desktop Client automatically detecting email settings for Homemail.com and prompting user to continue.
Step 2: Once Mailbird has detected the settings, you’ll be prompted to continue. Click “Continue” to move to the final step.
With the settings automatically configured, your Homemail online account setup in Mailbird is complete.
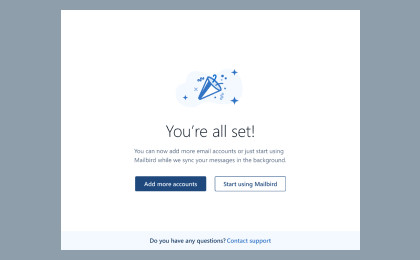 Step 3: Confirmation screen on Mailbird Desktop Client indicating successful Homemail.com account setup with options to add more accounts or start using Mailbird.
Step 3: You’re all set! You can now choose to add more email accounts or start using Mailbird to manage your Homemail online and other email addresses.
If you haven’t yet experienced the effortless setup of Mailbird, you can give it a try to automatically configure your Homemail online settings and discover its other features.
Give Mailbird a try now
Setting Up Homemail Online in Gmail
Gmail, a widely used web-based email service, also allows you to manage your Homemail online account. Here’s how to set it up:
First, navigate to Gmail in your web browser and log in to your Gmail account.
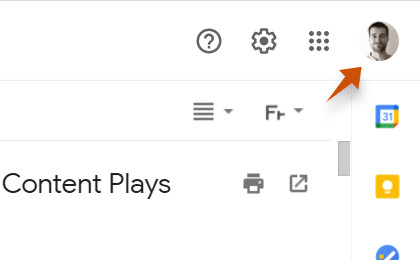 Step 1: Gmail settings menu accessed by clicking the settings icon in the top right corner and selecting 'See all settings'.
Step 1: In the top right corner of your Gmail interface, click on the “Settings” icon (gear icon). From the dropdown menu, select “See all settings.”
Next, you need to access the “Accounts and Import” settings within Gmail.
 Step 2: Accounts and Import tab selected within Gmail settings, highlighting the 'Add a mail account' option.
Step 2: Click on the “Accounts and Import” tab. Then, find the section “Check mail from other accounts” and click on “Add a mail account.”
A popup window will appear, prompting you for your email address.
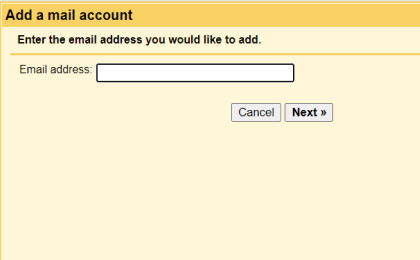 Step 3: Gmail popup window asking for the email address to add, with field pre-filled with '[email protected]'.
Step 3: Enter your Homemail online email address in the field provided and click “Next.”
You’ll be presented with two options for linking your email account.
 Step 4: Gmail popup window presenting options to link account via Gmailify or POP3, prompting user selection.
Step 4: Select your preferred option. For general Homemail online setup, choosing “POP3” is common. Click “Next.”
Now, you’ll need to enter your Homemail online server settings.
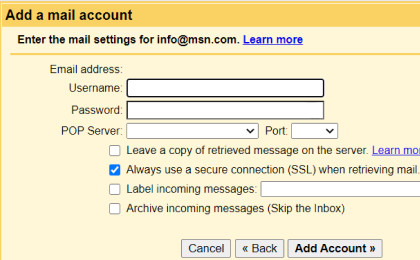 Step 5: Gmail popup window for manual POP3 configuration, requesting email address, password, POP server details (pop.mail.com, Port 995), and related settings for Homemail.com.
Step 5: Enter the following information:
- Username: Your Homemail online email address ([email protected])
- Password: Your Homemail online password
- POP Server: pop.mail.com
- Port: 995
- Ensure “Leave a copy of retrieved message on the server” is checked if you want to keep emails on the Homemail online server.
- Check “Always use a secure connection (SSL) when retrieving mail.”
- Choose whether to label incoming messages.
- Decide if you want to archive incoming messages.
Click “Add Account” to finish the setup.
If setting up Gmail manually seems time-consuming, remember that Mailbird can automatically configure these settings for your Homemail online account.
Try Mailbird for easy setup
Setting Up Homemail Online in Outlook
Microsoft Outlook is another popular email client. Here’s how to configure your Homemail online account in Outlook:
Open Outlook on your computer.
 Step 1: Outlook interface highlighting the 'File' tab in the upper-left corner for accessing account settings.
Step 1: Click on the “File” tab located in the upper-left corner of the Outlook window.
In the File menu, you’ll find the “Add Account” option.
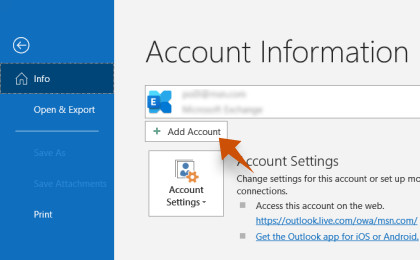 Step 2: Outlook 'Info' tab under 'File' menu, showing the 'Add Account' option for email configuration.
Step 2: Click “Add Account.”
Enter your Homemail online email address in the next screen.
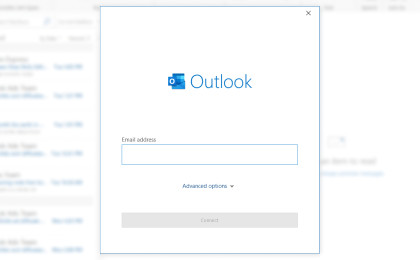 Step 3: Outlook 'Add Account' screen prompting for email address input, pre-filled with '[email protected]'.
Step 3: Enter your Homemail online email address and click “Connect.”
On the account type selection screen, choose “IMAP.”
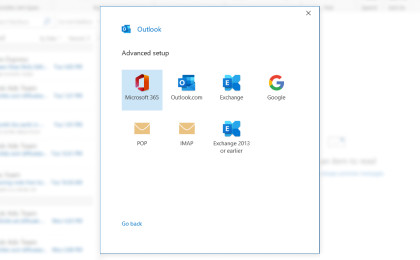 Step 4: Outlook account setup screen, highlighting the 'IMAP' option for manual account configuration.
Step 4: Select “IMAP” to configure your account manually.
You will now need to input your Homemail online server settings.
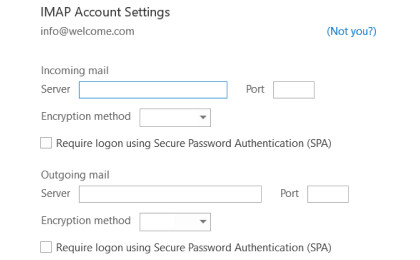 Step 5: Outlook manual setup screen for IMAP, requesting server details (imap.mail.com, Port 993, SSL, smtp.mail.com, Port 465, SSL) for Homemail.com.
Step 5: Add the following incoming and outgoing server information:
- Incoming Mail Server (IMAP): imap.mail.com, Port: 993, Encryption method: SSL
- Outgoing Mail Server (SMTP): smtp.mail.com, Port: 465, Encryption method: SSL
Click “Next” and then enter your Homemail online password when prompted. Follow any further on-screen instructions to complete the setup.
Avoid the manual setup hassle with Outlook and let Mailbird automatically configure your Homemail online account for you.
Get Mailbird for automatic Outlook-like setup
Configuring Homemail Online on Thunderbird
Mozilla Thunderbird is a free and open-source email client. Here’s how to set up your Homemail online account on Thunderbird:
Open Mozilla Thunderbird on your computer.
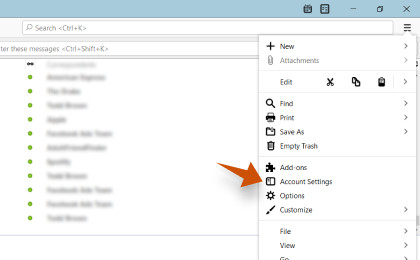 Step 1: Thunderbird interface showing the menu for accessing 'Account Settings' for email configuration.
Step 1: In Thunderbird, from the menu, select “Account Settings.” (You may need to click the menu icon in the top right corner to see this option).
Navigate to “Account Actions” to add a new email account.
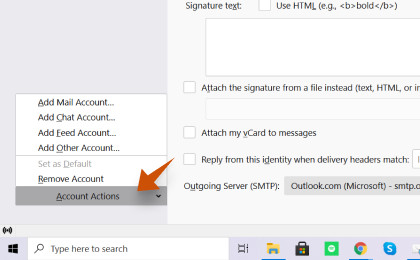 Step 2: Thunderbird 'Account Settings' window, highlighting 'Account Actions' dropdown and 'Add Mail Account…' option.
Step 2: In the bottom left corner of the Account Settings window, click on “Account Actions” and then select “Add Mail Account…”
Enter your account details to begin setup.
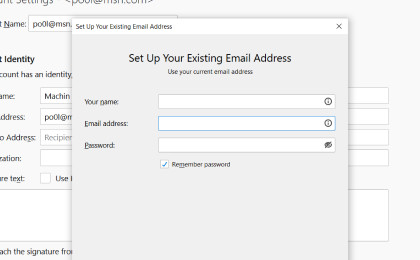 Step 3: Thunderbird 'Mail Account Setup' dialog, prompting for name, email address ('[email protected]'), and password for Homemail.com, with 'Configure manually…' highlighted.
Step 3: Enter your name, your Homemail online email address, and your Homemail online password. Instead of clicking “Continue,” click on “Configure manually…” to enter server settings.
Manually configure server settings for your Homemail online account.
 Step 4: Thunderbird manual configuration dialog for email account, displaying server details (imap.mail.com, smtp.mail.com, Ports 993 & 465, SSL) and requiring email & password for Homemail.com.
Step 4: Enter the following settings:
- Incoming Server:
- Protocol: IMAP
- Server hostname: imap.mail.com
- Port: 993
- Connection security: SSL/TLS
- Authentication method: Normal password
- Outgoing Server:
- Server hostname: smtp.mail.com
- Port: 465
- Connection security: SSL/TLS
- Authentication method: Normal password
- Username: Your Homemail online email address for both incoming and outgoing servers.
Click “Done” to complete the configuration.
Skip the manual steps in Thunderbird and enjoy the automatic Homemail online setup offered by Mailbird.
Try Mailbird instead of manual Thunderbird setup
Setting Up Homemail Online on Windows Mail
Windows Mail, the default email application on Windows, can also be used to access your Homemail online. Here’s how to set it up:
Open Windows Mail on your Windows system.
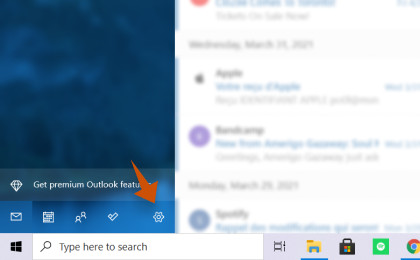 Step 1: Windows Mail interface showing the 'Settings' icon in the bottom left corner for accessing account options.
Step 1: Click on the “Settings” icon (gear icon) located in the bottom left corner of the Windows Mail window.
Access the “Manage accounts” section.
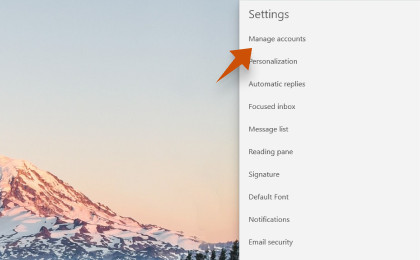 Step 2: Windows Mail settings panel, highlighting the 'Manage accounts' option for adding or modifying email accounts.
Step 2: Click on “Manage accounts.”
Choose to add a new account.
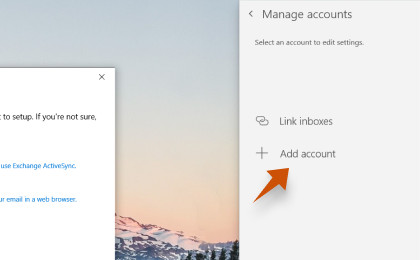 Step 3: Windows Mail 'Manage accounts' screen, showing '+ Add account' option to initiate new account setup.
Step 3: Click on “+ Add account.”
Select “Advanced setup” to configure manually.
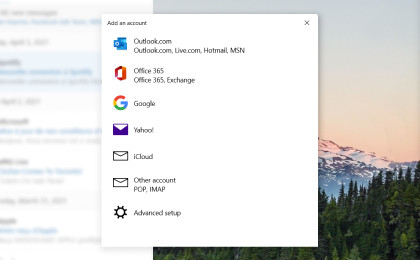 Step 4: Windows Mail 'Choose an account' screen, highlighting 'Advanced setup' for manual configuration options.
Step 4: Scroll down and click on “Advanced setup.”
Choose “Internet email” for IMAP or POP3 setup.
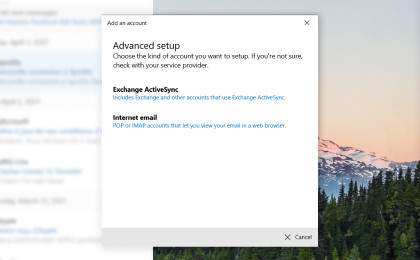 Step 5: Windows Mail 'Advanced setup' options, specifically highlighting and selecting 'Internet email' for manual email configuration.
Step 5: Click on “Internet email.”
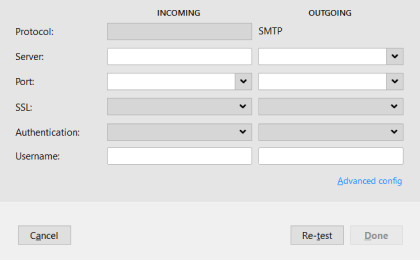
Enter your Homemail online account and server settings.
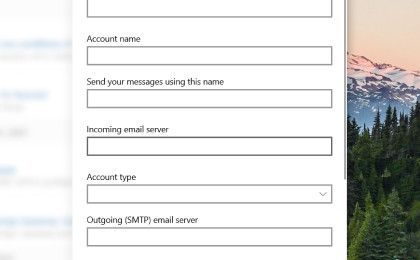 Step 6: Windows Mail 'Internet email account' setup form, requiring email address ('[email protected]'), name, and server details (imap.mail.com, smtp.mail.com).
Step 6: Enter the following information:
- Email address: Your Homemail online email address ([email protected])
- Username: Your Homemail online email address ([email protected])
- Password: Your Homemail online password
- Account name: (e.g., Homemail Online)
- Send your messages using this name: Your full name
- Incoming mail server: imap.mail.com (or pop.mail.com if you prefer POP3)
- Account type: IMAP (or POP3)
- Outgoing (SMTP) mail server: smtp.mail.com
- Ensure all checkboxes for SSL and outgoing server authentication are checked (usually pre-selected).
Click “Sign-in” to complete the setup.
Avoid the detailed manual configuration in Windows Mail and let Mailbird handle the Homemail online setup automatically for a smoother experience.
Choose Mailbird for easy Windows Mail setup alternative
Conclusion
Setting up your Homemail online account across various email clients is generally a straightforward process, whether you choose to configure it on Mailbird, Gmail, Outlook, Thunderbird, or Windows Mail. While manual setup is possible on each client by following the steps outlined above, Mailbird stands out by offering a potentially automatic configuration, simplifying the process significantly.
For users seeking a hassle-free experience and wishing to avoid manual server settings, Mailbird presents itself as an excellent alternative. Its intelligent detection of server settings for Homemail online can save time and effort, making it a user-friendly choice for managing your email communications. Whether you opt for manual configuration or automatic setup, accessing your Homemail online from your preferred email client is now within easy reach.