
Creating an Apple ID is your first step into the vast ecosystem of Apple services. Whether you’re a new iPhone user, exploring Apple Music, or want to utilize iCloud, an Apple ID, now known as Apple Account, is essential. This single account grants you access to everything Apple offers, from the App Store and Apple TV+ to iCloud storage and beyond.
If you’re wondering how to get started and create your Apple ID online, you’ve come to the right place. This guide will walk you through the process of creating your Apple Account online and on various devices, ensuring you can quickly access all the amazing features Apple has to offer.
Creating Your Apple ID Online: A Step-by-Step Guide
The most straightforward way to create your Apple ID is directly through the web. This method is convenient whether you are on a computer, Android device, or any device with a web browser. Here’s how to Create Apple Id Online:
-
Navigate to the Apple Account Creation Page: Open your web browser and go to account.apple.com. Once there, look for and click on the prominent link or button labeled Create Your Apple Account.
 Web page showing the Create your Apple Account link on account.apple.com
 -
Fill in Your Personal Information: You will be directed to a signup form. Here, you’ll need to provide the following details:
- Email Address: Enter a valid and accessible email address. This email will become your Apple ID username and will be used for communication from Apple.
- Password: Create a strong, secure password. Follow the on-screen instructions to ensure your password meets Apple’s security requirements, typically including a mix of uppercase and lowercase letters, numbers, and symbols.
- Region: Select your country or region from the dropdown menu. Ensure you choose the correct region as it can affect the services and content available to you.
- Birthday: Enter your date of birth. This information is used to verify your age and may be required for certain services.
- Phone Number: Provide a phone number that you can always access. This number is crucial for account recovery and two-factor authentication, adding an extra layer of security to your Apple Account.
-
Opt-in for Apple Updates (Optional): You’ll see checkboxes to subscribe to Apple Updates. Select these if you wish to receive the latest news, software updates, product announcements, and service information directly from Apple.
-
Complete the Verification Process: Click Continue after filling in all the required information. Apple will then require you to verify both your email address and phone number to ensure the information is accurate and belongs to you.
- Email Verification: Apple will send a verification email to the email address you provided. Open your email inbox, find the email from Apple, and follow the instructions within to verify your email address. This usually involves clicking a verification link.
- Phone Number Verification: Apple will also send a verification code via SMS to the phone number you entered. Enter this code on the Apple Account creation page to verify your phone number.
Once you have successfully verified both your email address and phone number, your Apple ID is created and ready to use! You can now sign in to various Apple services and devices with your new Apple Account.
Creating Your Apple ID on Different Devices
While creating your Apple ID online is simple, you can also create one directly on your Apple devices and even on Windows PCs. Here’s how:
On iPhone, iPad, or Apple Vision Pro
You can create an Apple ID during the initial setup of your device or later through the App Store or Settings.
During Device Setup:
-
When setting up your new iPhone, iPad, or Apple Vision Pro, proceed through the setup screens until you reach the Apple ID section.
-
Tap “Forgot password or don’t have an Apple Account?”
-
Then, tap Create a Free Apple Account.
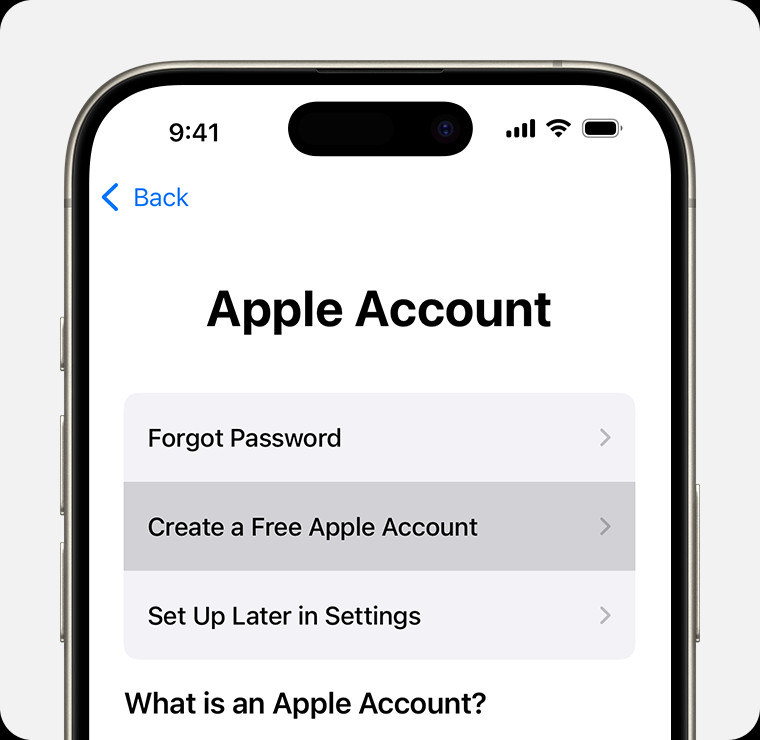 iPhone displaying the option to Create a Free Apple Account during setup
 -
Follow the on-screen prompts to enter your birthday, name, email address, create a password, set your region, and set up two-factor authentication.
Through the App Store:
-
Open the App Store app on your device.
-
Tap your profile icon or the Sign-in button.
-
Tap Create New Apple Account. (Ensure you are signed out of iCloud if you don’t see this option).
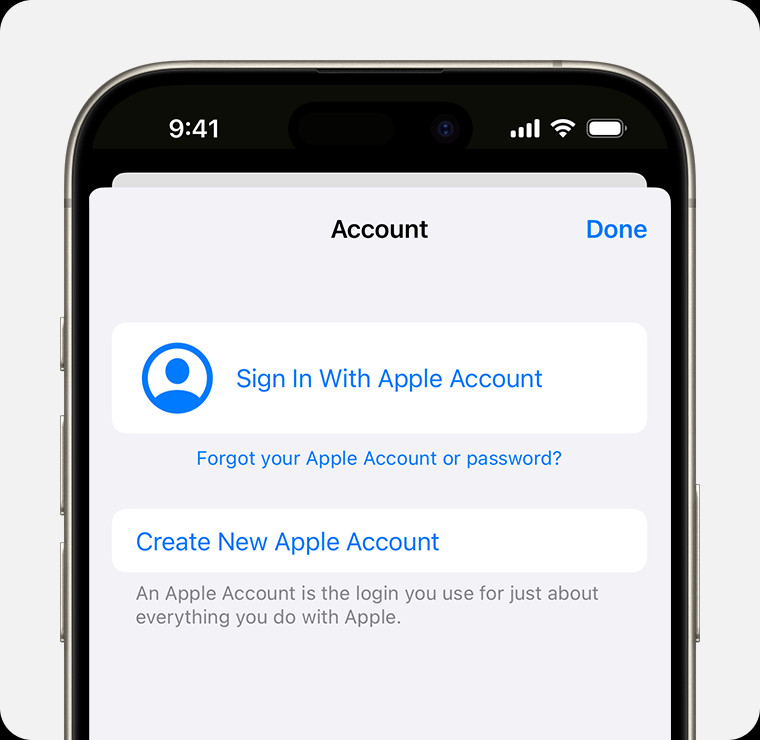 iPhone showing the Create New Apple Account option in the App Store
 -
Follow the on-screen instructions to provide your email, password, region, payment information (optional), and phone number, then verify your email address.
On Mac
-
Go to the Apple menu () in the top-left corner of your screen and select System Settings (or System Preferences in older macOS versions).
-
Click on Sign in (or Sign In with your Apple ID).
-
Click “Don’t Have an Account?”
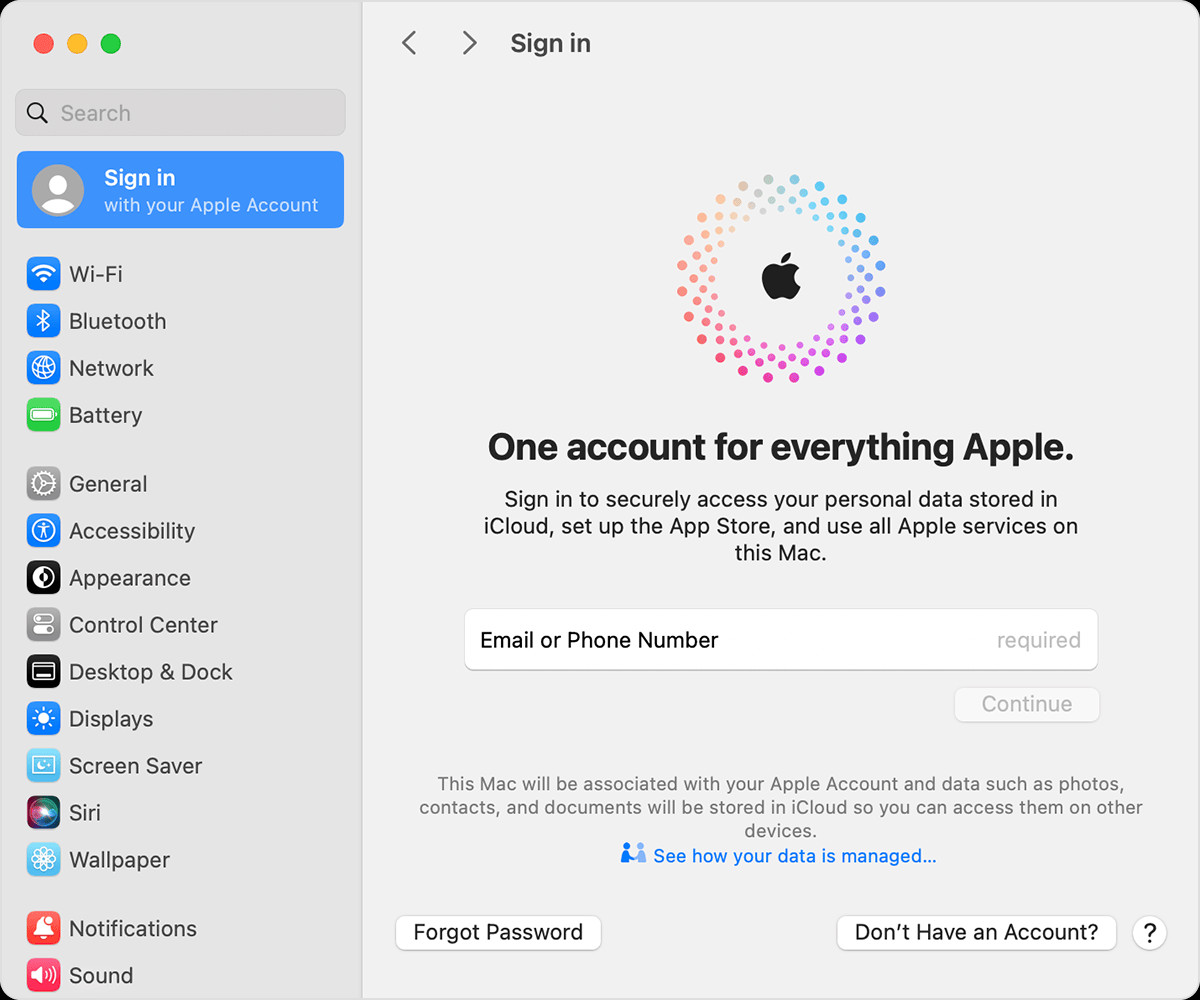 Mac System Settings showing the Don't Have an Account button during sign-in
 -
Follow the prompts to enter your information, including birthday, email, password, region, payment details (optional), and phone number, and then verify your email address.
On a Windows PC
You can create an Apple ID on a Windows PC through the Apple TV app, Apple Music app, or iTunes for Windows.
Using Apple TV or Apple Music App:
- Open either the Apple TV app or Apple Music app.
- Click Sign In in the sidebar.
- Click Create New Apple Account.
- Follow the on-screen steps to provide your details, including email, password, region, payment information (optional), and verify your email.
Using iTunes for Windows:
- Open iTunes for Windows.
- In the menu bar, go to Account > Sign In > Create New Apple Account.
- Follow the prompts to enter your information and verify your email address.
On Other Devices
For devices like Apple TV, smart TVs, Android devices, and streaming devices, you can usually create an Apple ID by following the on-screen instructions within the Apple TV app or Apple Music app. You might be redirected to activate.apple.com on some smart TVs to complete the process.
Why Create an Apple ID?
An Apple ID is more than just an account; it’s your key to unlocking the full potential of Apple’s ecosystem. With your Apple ID, you can:
- Access Apple Services: Use services like iCloud, App Store, Apple Music, Apple TV+, iMessage, FaceTime, and more.
- Sync Devices: Seamlessly synchronize your data across all your Apple devices, including photos, contacts, calendars, and documents via iCloud.
- Download Apps: Access the App Store to download millions of apps for iPhone, iPad, and Mac.
- Make Purchases: Buy music, movies, TV shows, and apps from Apple’s digital stores.
- Enable Find My: Locate your lost or misplaced Apple devices using the Find My feature.
- Family Sharing: Set up Family Sharing to share purchases, subscriptions, and iCloud storage with up to five family members.
Get Started with Your Apple ID Today
Creating an Apple ID is a simple and essential step to enjoying everything Apple has to offer. Whether you choose to create apple id online through a web browser or directly on your device, the process is user-friendly and secure. Once set up, your Apple Account opens up a world of services and seamless integration across the Apple ecosystem. Start creating your Apple ID today and unlock the full Apple experience!